
Lesson 1: Connecting Facebook as a Target Store
This step-by-step tutorial will go over how to add Facebook as a selling channel on ExportYourStore, explain how to use and customize your Facebook product feed, and teach you how to easily link your feed to upload your products to Facebook.
Step 1: Add Facebook as a Selling Channel
Begin by navigating to your channel overview by clicking “Channels” in the left-hand navigation pane. Then, click the “Add a Target Marketplace” tile, and select Facebook from the dropdown. Finally, click “Link Account”.

Step 2: Generating Your Facebook Product Feed
Once you’ve added Facebook as a selling channel, click “Products” in the left-hand navigation pane, then click on the “Feeds” tab. Here, you’ll be able to generate a product feed for your Facebook selling channel. Click “Create Feed”.

Step 3: Understanding Your Facebook Product Feed
When you create your Facebook product feed with ExportYourStore, you’ll get a product feed that is already mapped to your source categories by default. In the majority of cases, the default mapping will be sufficient for exporting your products from your source store to your new Facebook selling channel with no modifications. For this reason, we suggest using it as-is, especially if this is the first time you’ll be using a feed to upload products. If you’d like to customize the feed, keep reading; otherwise, continue on to Step 4: Selecting Your Products.
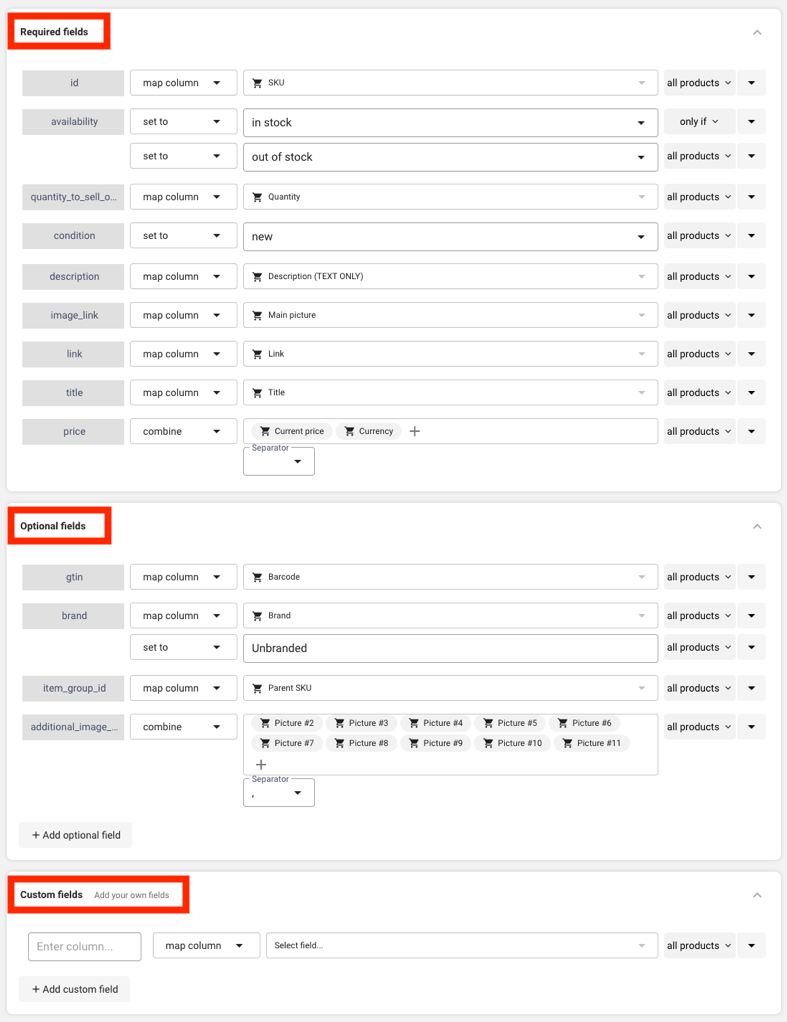
Customizing Your Product Feed
Before you begin customizing the automatically-generated feed, you’ll need to understand the basic feed structure of Facebook’s product feed. The three main sections of the feed are:
Required Fields – These are mandatory product attribute fields, required in order to upload a product to Facebook
Optional Fields – Including these can enhance your products. These fields may change depending on the product’s category.
Customized Fields – Entirely customizable fields that you can create and modify, oftentimes used for troubleshooting feed errors.
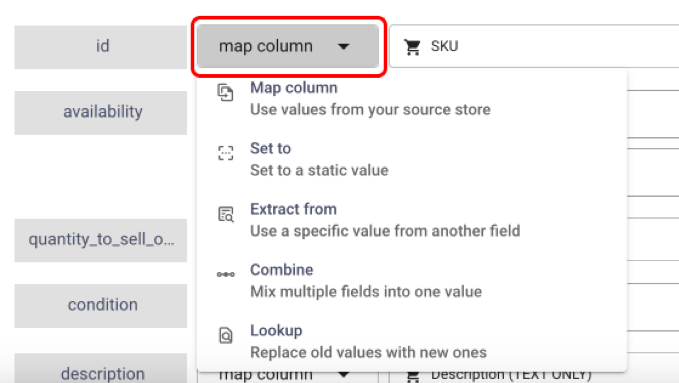
You’ll have several options when it comes to customizing your field mapping. You can choose to map a product attribute from your source store to a given column and define a static value. This value can be free text, can combine multiple existing product attribute fields, or even be a custom lookup list that replaces source attribute values with entirely new attribute values.

Step 4: Selecting Your Products and Saving the Feed
After you’ve generated your product feed, you’ll need to select the products that you want to associate with this feed. To do this, click “Choose Products”.

You can choose to associate all products, utilize filters to automatically select which products will be included, or manually select products.
Once you’ve selected the products you want to export to Facebook with this feed, you’ll need to assign a name to your feed. Choose a name that you’ll easily recognize and that enables you to know what products are associated with the feed at a glance.

Click “Create” and you’re done!
Step 5: Getting Your Feed Link to Sync Your Products to Facebook
Once your feed is ready, click the link icon button to copy your feed link to your clipboard. We’ll go over how to set up your Facebook Commerce account in the next step of this tutorial, and we’ll use this link to sync your Facebook Commerce account with ExportYourStore.

Step 6: Linking ExportYourStore with Your Facebook Commerce Account
Begin by logging into Facebook Business and navigating to “Commerce Manager”.

Next, navigate to your catalog. If you do not have one, create one by pressing the “+ Add Catalog” button.

Then, click “Data Sources” on the left-hand navigation pane, and click “Add New Feed”.

Select “Yes” when prompted with the question “Are you ready to upload your spreadsheet file?”, then click “Next”.

Now, click the “Use a URL” tab, and paste the Facebook feed link you copied in Step 5: Getting Your Feed Link to Sync Your Products to Facebook. Then, click “Next”. Note that you will not need to add login credentials (username and password).

Now, you’ll need to define the frequency at which Facebook will check in with your feed for updates. We recommend setting up either a daily update or an hourly update, depending on your order rate and product changes. Once you’ve defined your feed update frequency, click “Next”.

Now, take a moment to review your settings. If everything looks good, click “Save Feed and Upload”.

After you’ve uploaded your product feed, you can ensure that it’s running smoothly by looking at your Data Feeds section at the “Last Update” column. When you see “All Good”, it means that your products have successfully been uploaded to Facebook via your product feed.

Continue to lesson 2: Errors and troubleshooting on Facebook.