
Lesson 5: Setting Up Your Product Feed
In order to sell on Amazon, you’ll need to upload your products into Amazon using a product upload file, known as a feed file. Amazon provides you with a selection of feed templates, which you will choose according to the type of products you’d like to sell (i.e. clothing, jewelry, etc.) and the marketplaces on which you’ll be selling (i.e. Amazon.com, Amazon.mx, etc.).
.svg)
You can set up this product feed on your own with the help of this tutorial, or purchase ExportYourStore's one time feed setup for $149.
In this lesson, you’ll learn:
- How to find the correct feed template for your products and upload it to ExportYourStore
- The fundamentals of feed mapping and how to define a basic set of rules to map categories
- How to choose which products will be included in your feed template
- How to review your feed file and ensure that all categories have been mapped correctly
Downloading the Correct Feed Template from Amazon
To get started, you’ll first need to find the correct template for the products you’re selling on Amazon. Begin by logging into your ExportYourStore account, navigating to “Products” via the left-hand navigation pane, and clicking “create a feed template.”

Then, click “Download an Inventory File.”
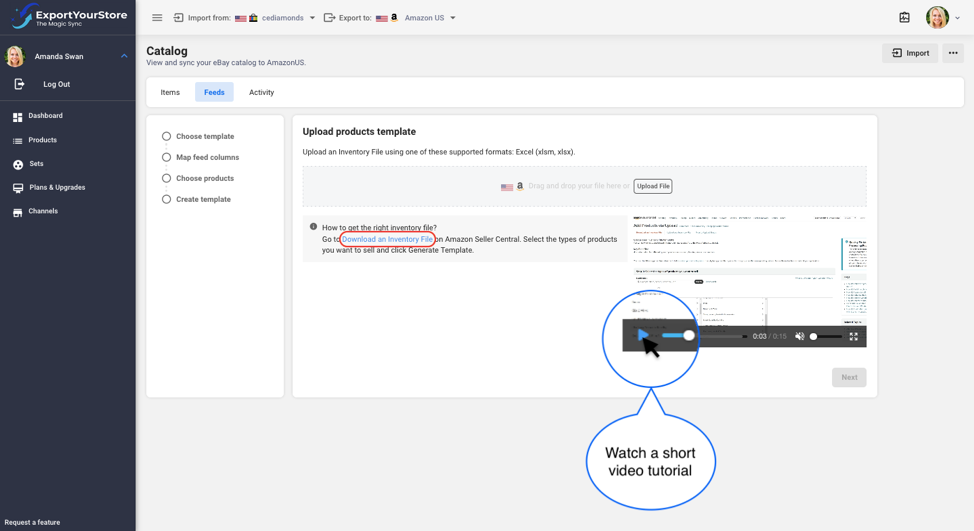
This will open Amazon’s listing upload feed template generation page, from where you’ll be able to download the necessary import feed template for the particular items you wish to list on Amazon.
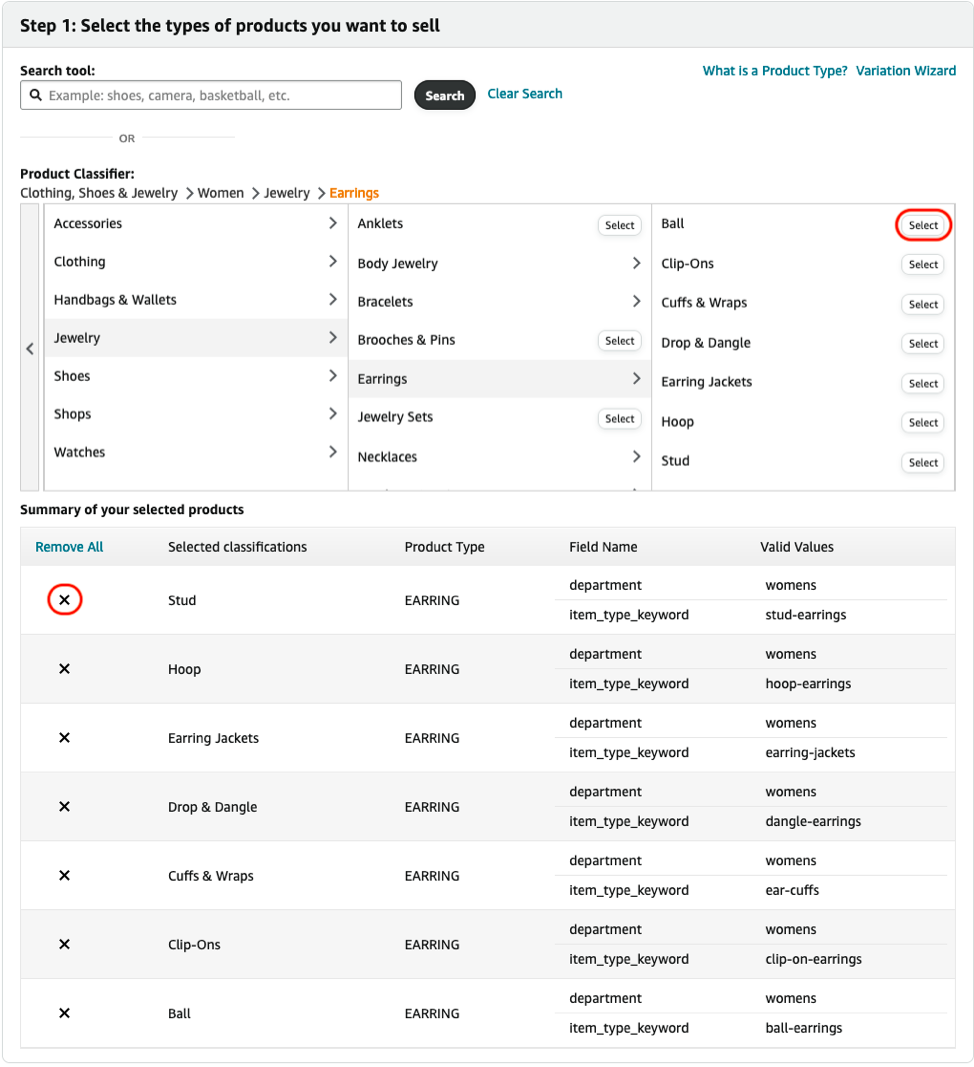
In step one, you’ll be able to select the type of products you want to list on Amazon. Navigate through the categories and click “select” whenever you find a product category that matches the product you wish to sell. If you’ve accidentally added a category, you can remove it by clicking the “x” in the first column of its corresponding row. Note that you will need to generate a template for each type of product you wish to sell on Amazon (i.e. one template for jewelry and another for auto parts). For more information about choosing the correct template, log into your Amazon selling account, then click here to see Amazon’s help page. You can also watch the embedded short instructional video on how to select categories for your template.
Next, you’ll select the marketplaces to which you’d like to list your products.

Then, you’ll select the type of template. This section enables you to select the product attributes that will be included in the template. Choose all attributes except FBA and B2B.
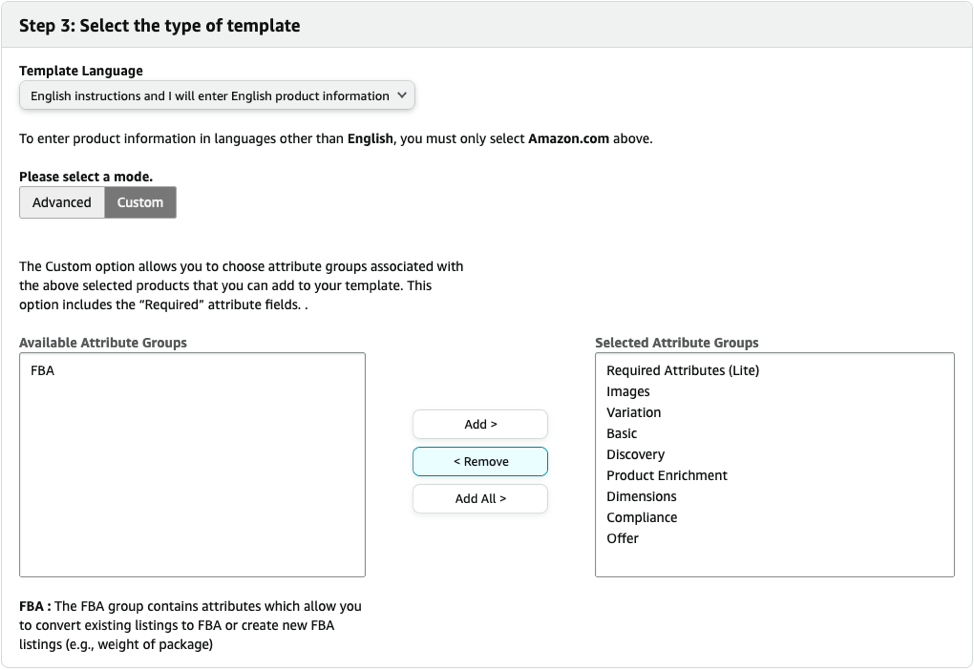
Finally, click the “Generate Template” button. This will generate a blank product feed template according to your specifications, which you’ll need to download and save to your computer.
Understanding Amazon’s Product Feed Template
Amazon requires different categories to be populated with product attributes depending on the product’s category, and at times depending on which other product attributes have been provided.
Some attributes can only be populated with certain values. These values are known as valid values, and differ from attribute to attribute. The feed generation wizard, which we will see in the next step, will automatically import the valid values for each attribute based on the template you’ve uploaded, so you won’t need to know them ahead of time
The process of mapping categories is simply taking our source eBay store categories and translating them into their corresponding categories on Amazon.
Uploading the Feed Template to ExportYourStore
Next, you’ll return to ExportYourStore and upload the file you’ve just downloaded from Amazon. The template should be blank, as downloaded from Amazon, with no populated attributes.
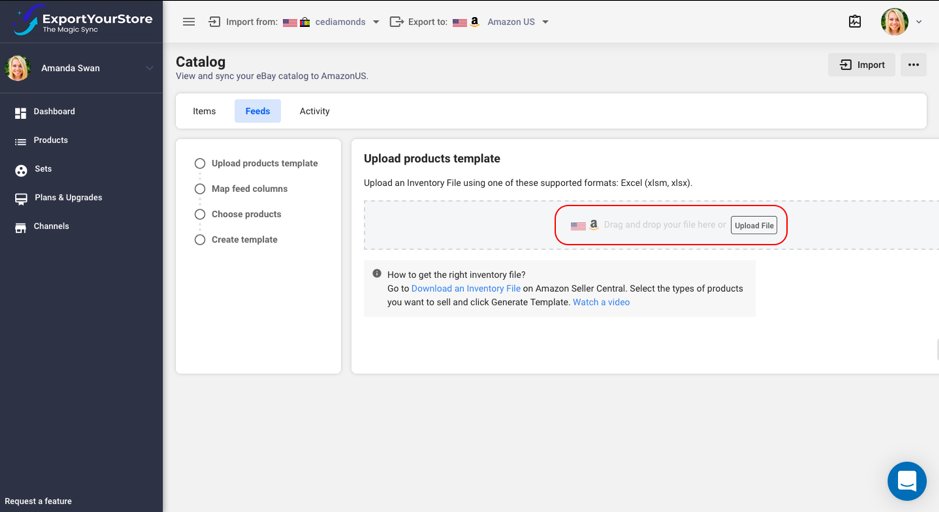
After the file has been uploaded, click “Next.”

Mapping Feed Categories
Now, you’ll need to define how your source marketplace attributes – eBay in our case – will translate to Amazon attributes. You’ll see all the required fields automatically, based on the Amazon template you uploaded in the previous step.
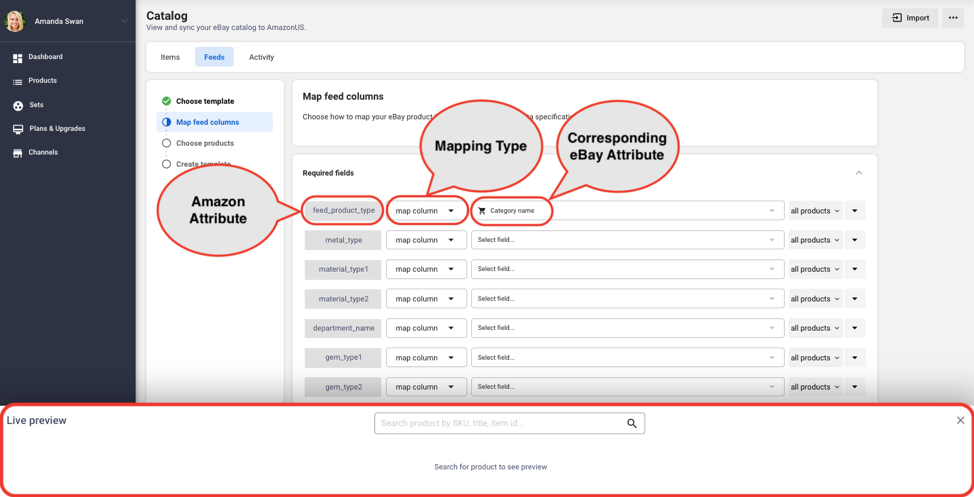
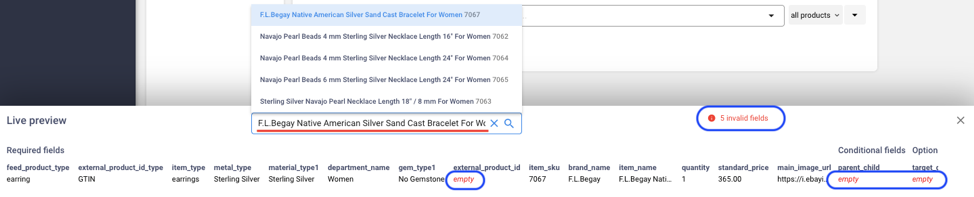
The banner at the bottom of the page enables you to search for products and see how the mapping rules will apply on the feed file.
Any missing attributes will be highlighted in red.
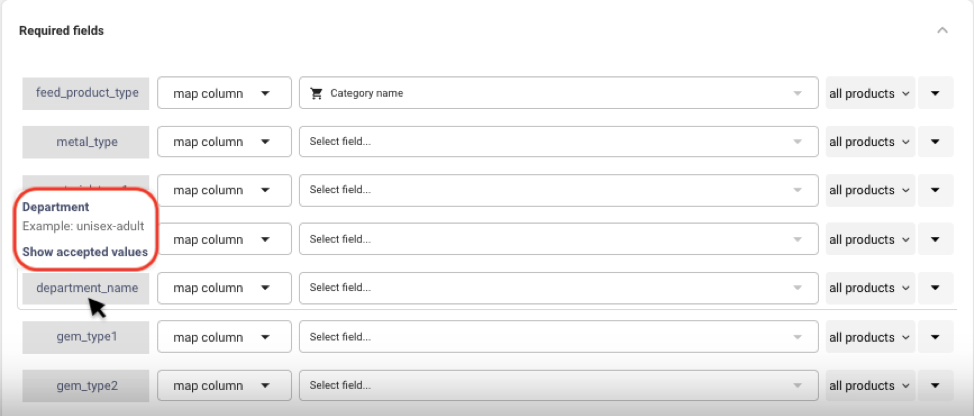
To see an example of a correct mapping of a particular attribute, hover the column name with your mouse.
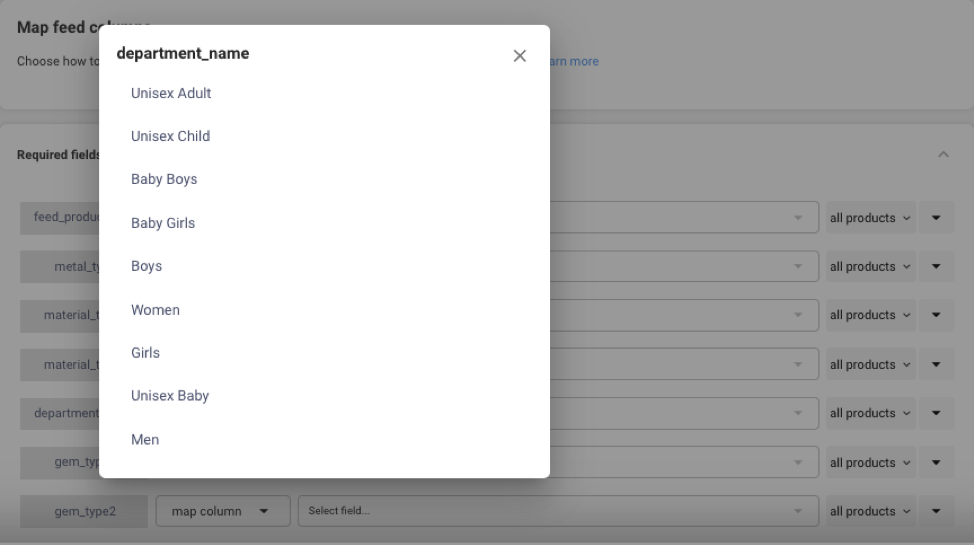
To see a list of valid values – that is, values that Amazon will accept as attributes in this particular field – click “Show Accepted Values.”
Note that there are certain attributes that are automatically mapped by our feed template tool. For this reason, you will not find them in the dropdown menu when adding feed columns. These categories, as they appear in the Amazon feed template, are:
- item_sku – The SKU on your source store. (Do not change if you're not sure what you're doing. Changing the SKU on Amazon will get the item out-of-sync if the SKU doesn't exists on your source store.).
- quantity
- standard_price
- parent_sku – Will be automatically assigned for items with variations.
- parent_child
- relationship_type
- update_delete
In the absence of explicit mapping for these categories, ExportYourStore will also map the following categories by default:
- product_description
- item_type: only if the categories are mapped using the categories mapper
- recommended_browse_nodes: only if the categories are mapped using the categories mapper
- brand_name
- item_name
- currency
- condition_type
- manufacturer
- part_number
- search_terms
- fulfillment_latency
- bullet_point: from bullet_point_1 to bullet_point_5
- main_image_url
- other_image_url: from other_image_url_1 to other_image_url_8
If you define your own mapping for these fields, the default mapping will be overridden by your mapping. To do this, simply add the necessary category by clicking the “Add Column” button, then define your custom mapping for the given field.
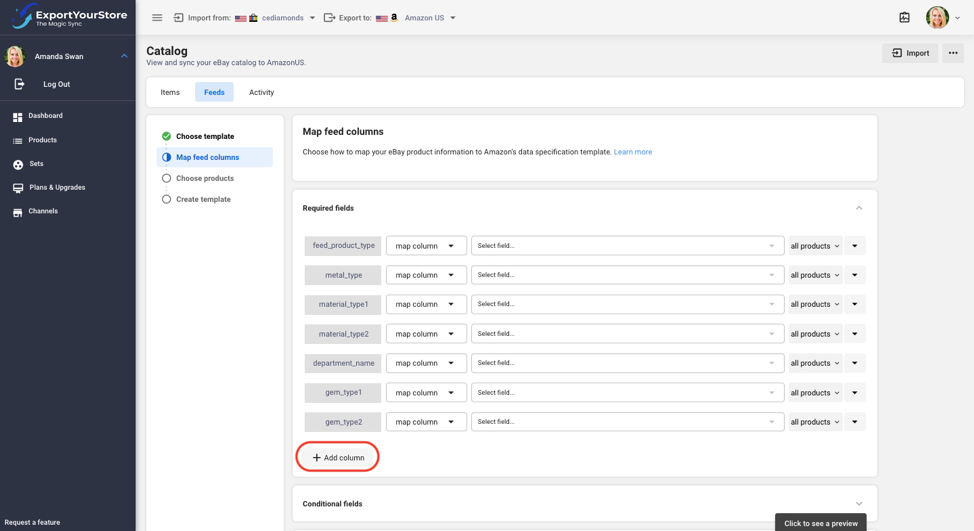
Now, we’ll map the required fields by matching them with the corresponding eBay attributes using the most common type mapping types – “map column” and “set to.”
“Map column” fills in the values based on the attributes from the source store.
“Set to” populates the given attribute with a custom static value.

Here you can see that we’ve used “set to” to map Amazon category “feed_product_type” to a static value, because the value “feed_product_type” is not available in our source eBay store. When you use the “set to” mapping type, you’ll be able to see a list of valid values for a given attribute
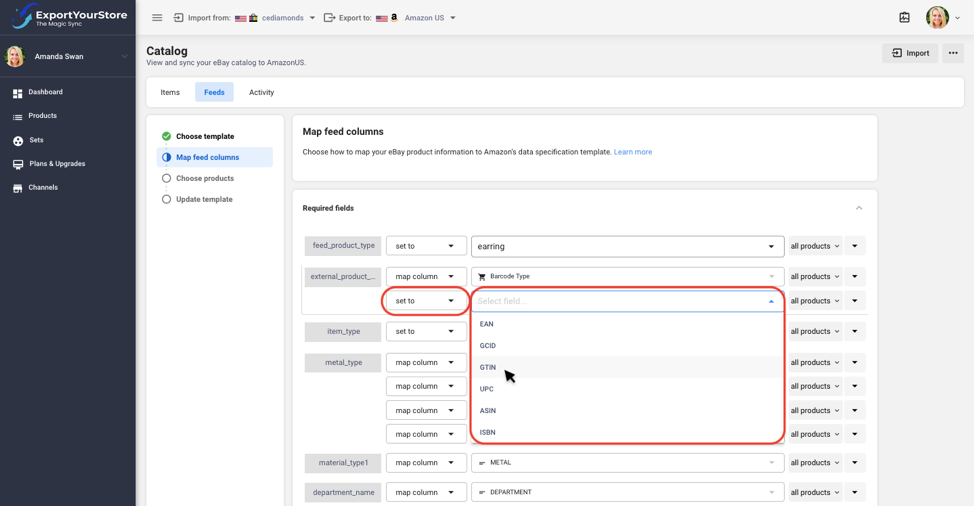
We’ve mapped the Amazon’s “external_product_id_type” to eBay’s “Barcode Type”, then added a “set to” fallback – a secondary mapping for a given category in cases where the first mapping attribute, in this case “Barcode Type” is not available from the source store – to set the value to GTIN if the attribute “Barcode Type” is not provided in the source store.
You can read about more advanced mapping types, modifiers, fallbacks, and conditions here.
In our example we’re cross-listing handmade jewelry, which does not have a UPC or EAN barcode. In this case, we can create a fallback that will input a GTIN value if another type of barcode is unavailable.
If you want to sell products that already have existing barcodes such as ISBN, UPC, or EAN, simply map the values directly: “Barcode” corresponds with the Amazon category “external_product_id” and “Barcode Type” corresponds with the Amazon category “external_product_id_type.”
If you already have a list of ASINs (Amazon Standard Identification Number: unique item catalog numbers used by Amazon) for your products, you can match them to your product SKUs with a SKU to ASIN lookup table.

In addition to the required fields, you’ll also have the option of mapping additional conditional fields and optional fields. Conditional fields are attribute fields that can only be populated when a separate related attribute field has value. For example, you would only be able to input a value for the attribute “gemstone_type” if the attribute “item_type” is “earring” (or another type of jewelry that could have gemstones). You would not be able to populate the attribute “gemstone_type” if the item type is an item without a gemstone (i.e. “item_type” value is “microscopes”).
Optional fields are attributes that are recommended for your product category. They increase your item’s performance in searches, and give buyers more information about what their purchasing. Map as many optional fields as you can to increase your products’ visibility and performance on Amazon.
Selecting Products from Your Source Store to Include in the Feed Template
Next, you’ll need to define which products from your source store will be mapped and included in the feed template. You can choose to map all your active products using this template, define filters to select products based on a various parameters, or manually select products from your source store to include in the template.
The most common method of selecting items is through filters, which is the method this tutorial will focus on.
Filters enable you to create a set of rules that will determine to which products the feed you defined in the previous section will apply.
You’ll be able to create a sequence of filter rules based on a variety of parameters, and see a preview of which of your current live products will be included in the feed file at the bottom of the page. You can add conditions by clicking “Add Another Filter”, and delete conditions by clicking the small trashcan icon next to each condition.
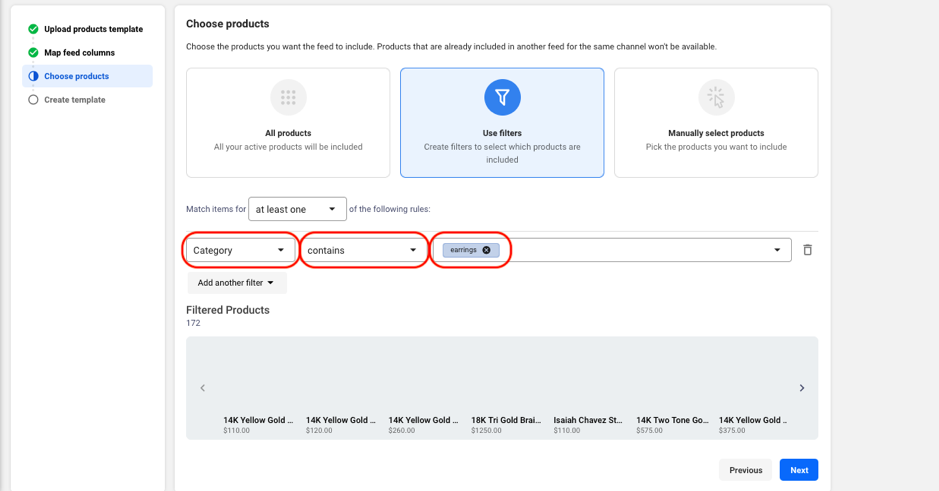
After you’ve defined your filters to determine which items the feed template will be applied to during import and sync, click “Next.”
Generating Your Feed Template
Once you’ve defined the filters for your feed template, you’ll need to give it a name. Use a unique and descriptive name for your feed template file so that you can easily recognize it among your other feed templates. After you’ve named your feed file, click “Create.”
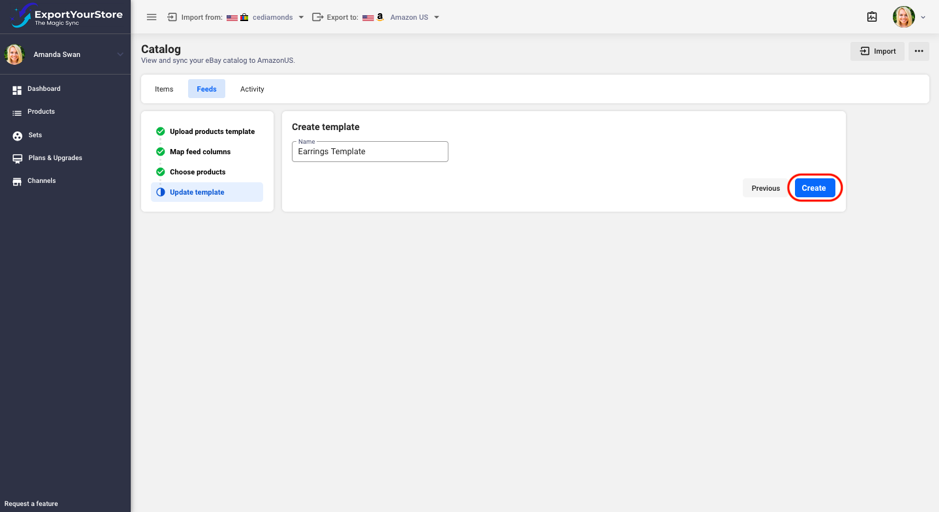
Your feed template is now saved on ExportYourStore, and can be used either to generate a feed file to upload to Amazon or to automatically sync products to Amazon.
Generating a Feed File from Your Feed Template
Now that your feed template is ready, you can use it to generate a feed file to upload to Amazon.
Click “Products” on the left navigation pane, then items. Select the items you wish to include in the feed file by ticking the box for each respective item. You’ll be able to see which feed template they belong to here as well. Then, click “Export” and select “Create Feed File.”

Your feed file will be generated per the mapping rules you’ve defined for the template.
When your feed file is ready, it will be added to the rest of your feed files under the “Activity” tab. Here you can see all your generated feed files, with the most recent file always at the top. To download it, click “Download.”

Reviewing Your Feed File
Before uploading your feed file to Amazon, we recommend reviewing the file to ensure that all the required categories have been mapped and that there are no errors.
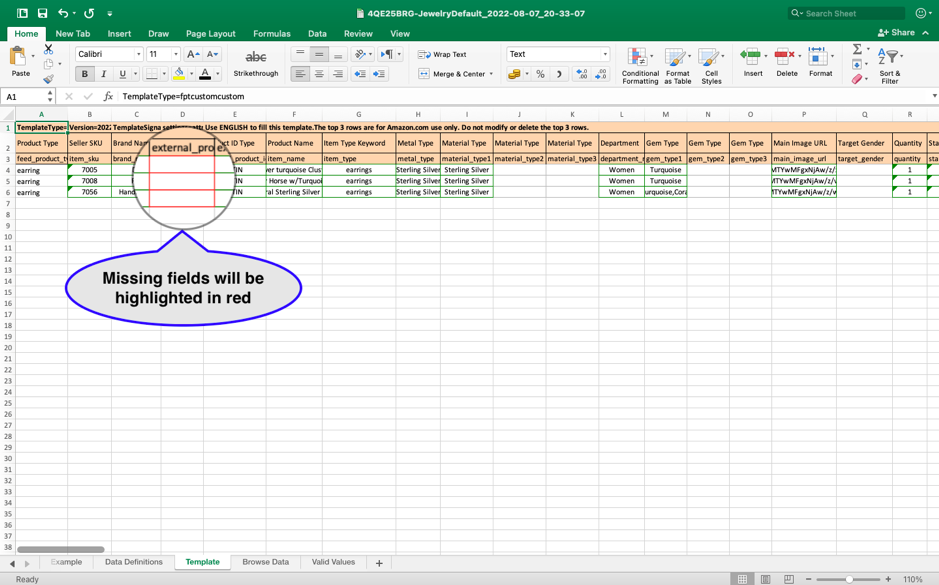
Any missing required fields will be highlighted in red, as shown in the figure below. In our case, because we’re using GTIN, the external product ID field can be left blank for now.
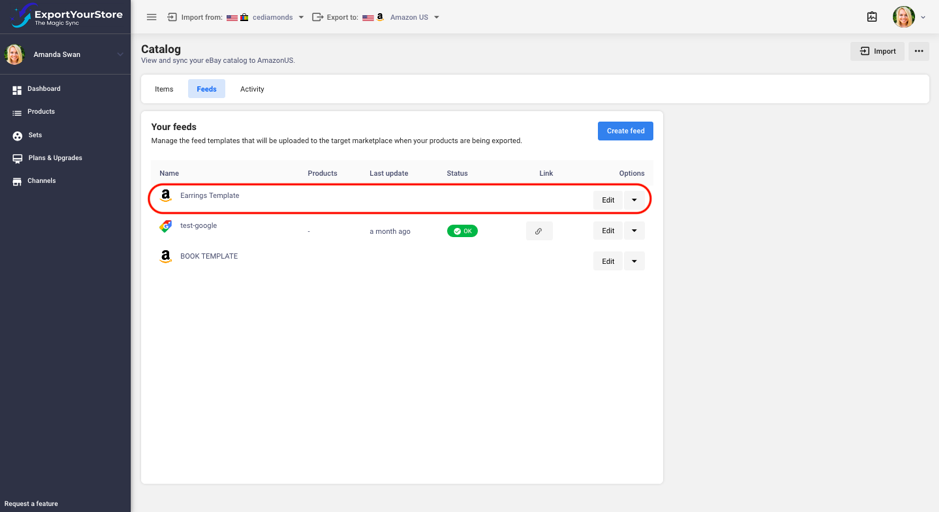
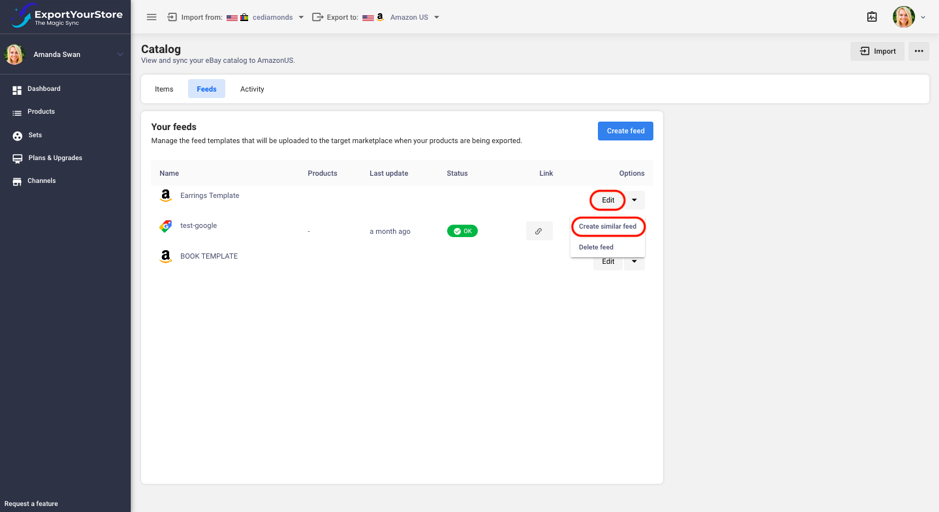
If you see any missing attributes or incorrect mapping, you can go back and edit your filter by clicking the “Feeds” tab, locating your feed template, and clicking “Edit.” You’ll also be able to create a similar feed using the mapping and filters you’ve already defined for this feed by clicking the menu arrow and selecting “Create Similar Feed.”
After you’ve fixed any errors and ensured that all categories have been mapped correctly, you’re ready to use your feed file to sync products to Amazon.
You’ll have the option of uploading your feed to Amazon manually, or syncing your products to Amazon via ExportYourStore.
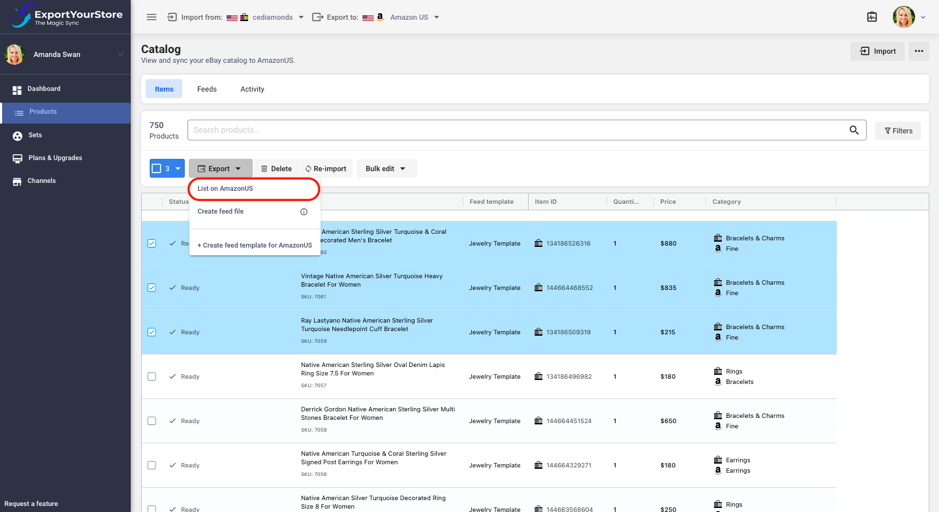
To upload and sync directly through ExportYourStore, select the items you wish to sync, click “Export,” and then click “List on AmazonUS.”
Continue to lesson 6: Common feed errors and how to fix them.